Not translated yet — showing English.
Connecting a Project to Unity
Last updated: 5 August 2026
Once the project has been created in PlayServ Backoffice, the next step is to connect it to Unity. Import the SDK package, enter your project credentials, sync the schema into generated models, and add a small bootstrap script — after that, the Unity project is ready to connect to PlayServ.
Before you start
Before connecting the SDK in Unity, make sure you already have:
- Unity 2021.3 or newer (Unity 6 is used in the screenshots below)
- a created project in PlayServ Backoffice — see Creating a New Project
- a Client key to use as the Game Access Token — see API Key Management
- the project Game ID
Note
Configuration lives in the PlayServ editor controls window inside Unity, using the credentials generated in Backoffice. The window resolves them through the project config asset (Assets/Resources/PlayServConfig.asset).
Import the SDK
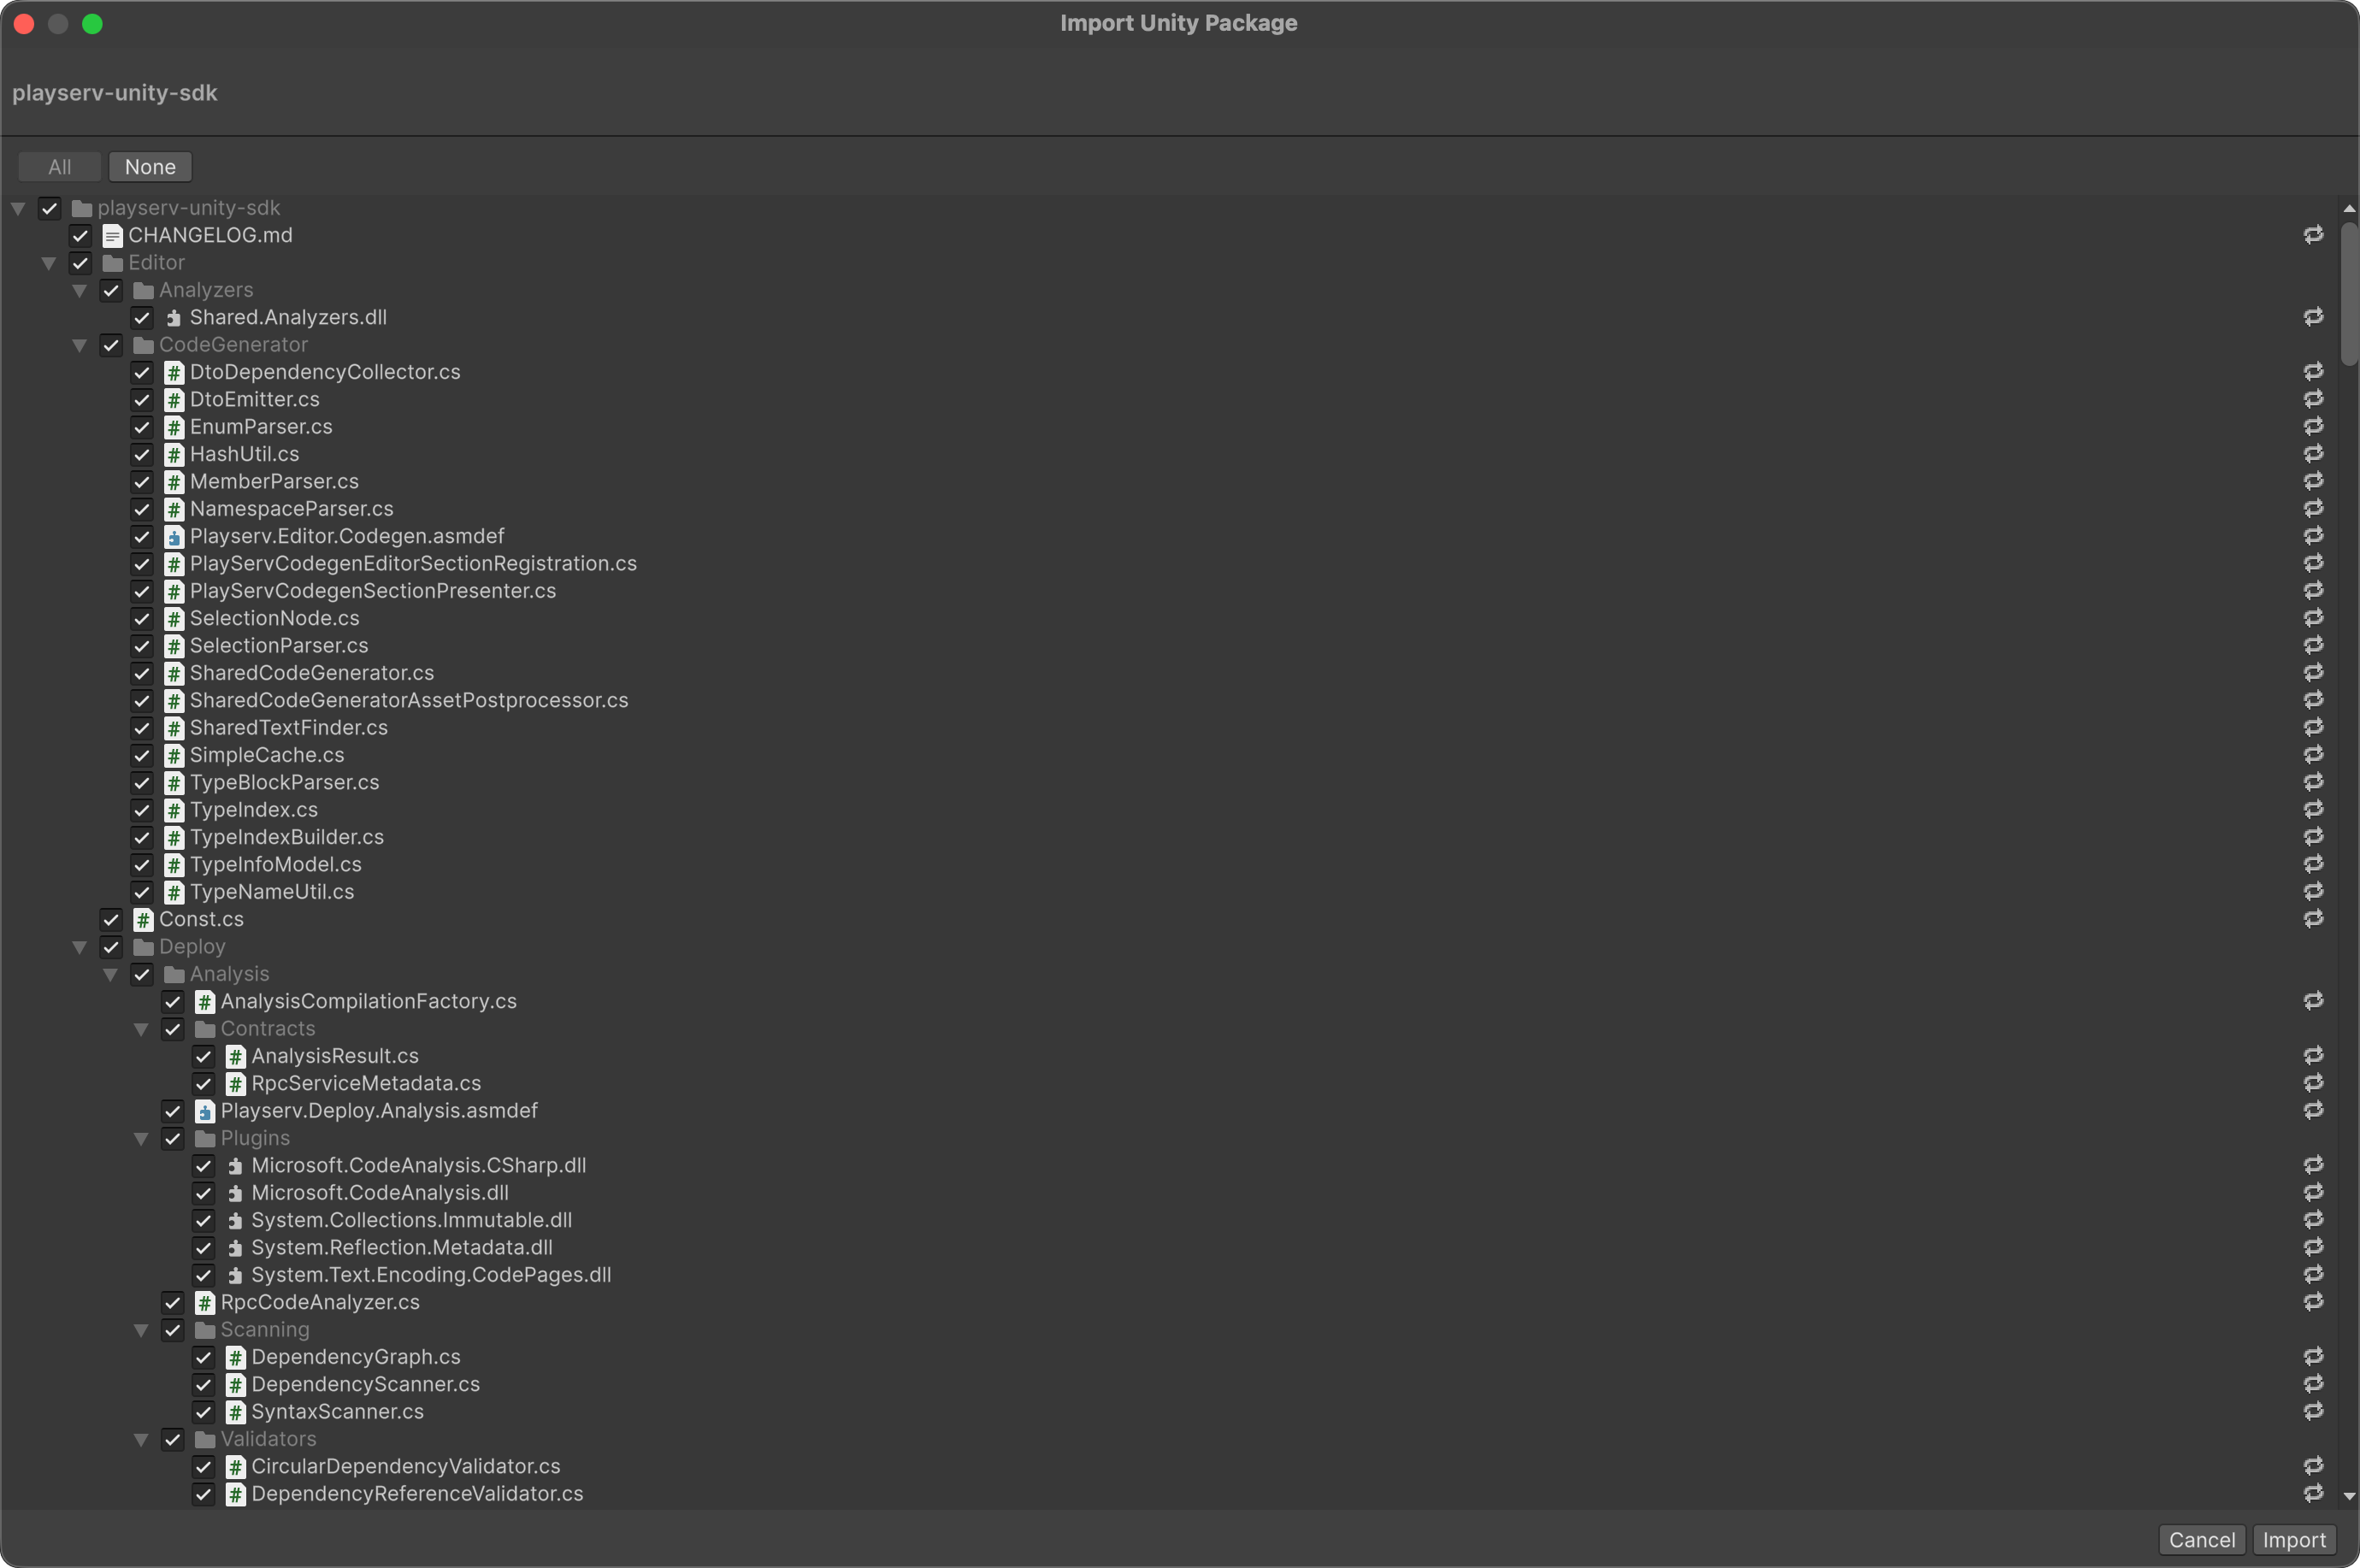
Import the PlayServ SDK into your project. Unity recompiles scripts after import — wait for the Compiling Scripts progress bar to finish before continuing.
Open Assets ▸ Import Package ▸ Custom Package…, select playserv-unity-sdk-<version>.unitypackage, keep everything selected in the Import Unity Package dialog, and click Import.
Note
Imported this way, the SDK lives under Assets/playserv-unity-sdk and Unity does not read the package's own manifest. If com.unity.nuget.newtonsoft-json is not installed automatically, add "com.unity.nuget.newtonsoft-json": "3.2.2" to Packages/manifest.json.
Install through the package manager instead:
openupm add com.playserv.sdkBoth paths install the same SDK — use whichever fits your project's dependency workflow.
Configure the PlayServ editor controls
Open the PlayServ editor controls window from Tools ▸ PlayServ ▸ Settings. This is the single place to manage runtime identity, sync models, and deploy server code, with a shortcut to the Backoffice Dashboard. The header shows the current Game ID and the installed SDK Version.
The window is organised into sections:
- Control Room → PlayServ Config — runtime identity, credentials, fixed endpoints, and the project-side config asset
- Server Code → Deployment — preview the RPC code closure, sync the deployed version, and ship the ZIP package to the deployment endpoint
- Schema → Model Sync — check the latest schema, compare timestamps, and regenerate the editor-side models
- Realtime → Events — generate the typed events API and keep event payload contracts close to the runtime
- Automation → Code Generation — generate DTOs on demand (optionally automatically) and clear the generated layer when you need a reset
A footer toggle, Show this window on Unity startup, controls whether the window opens automatically, and Open Docs links back to this documentation.
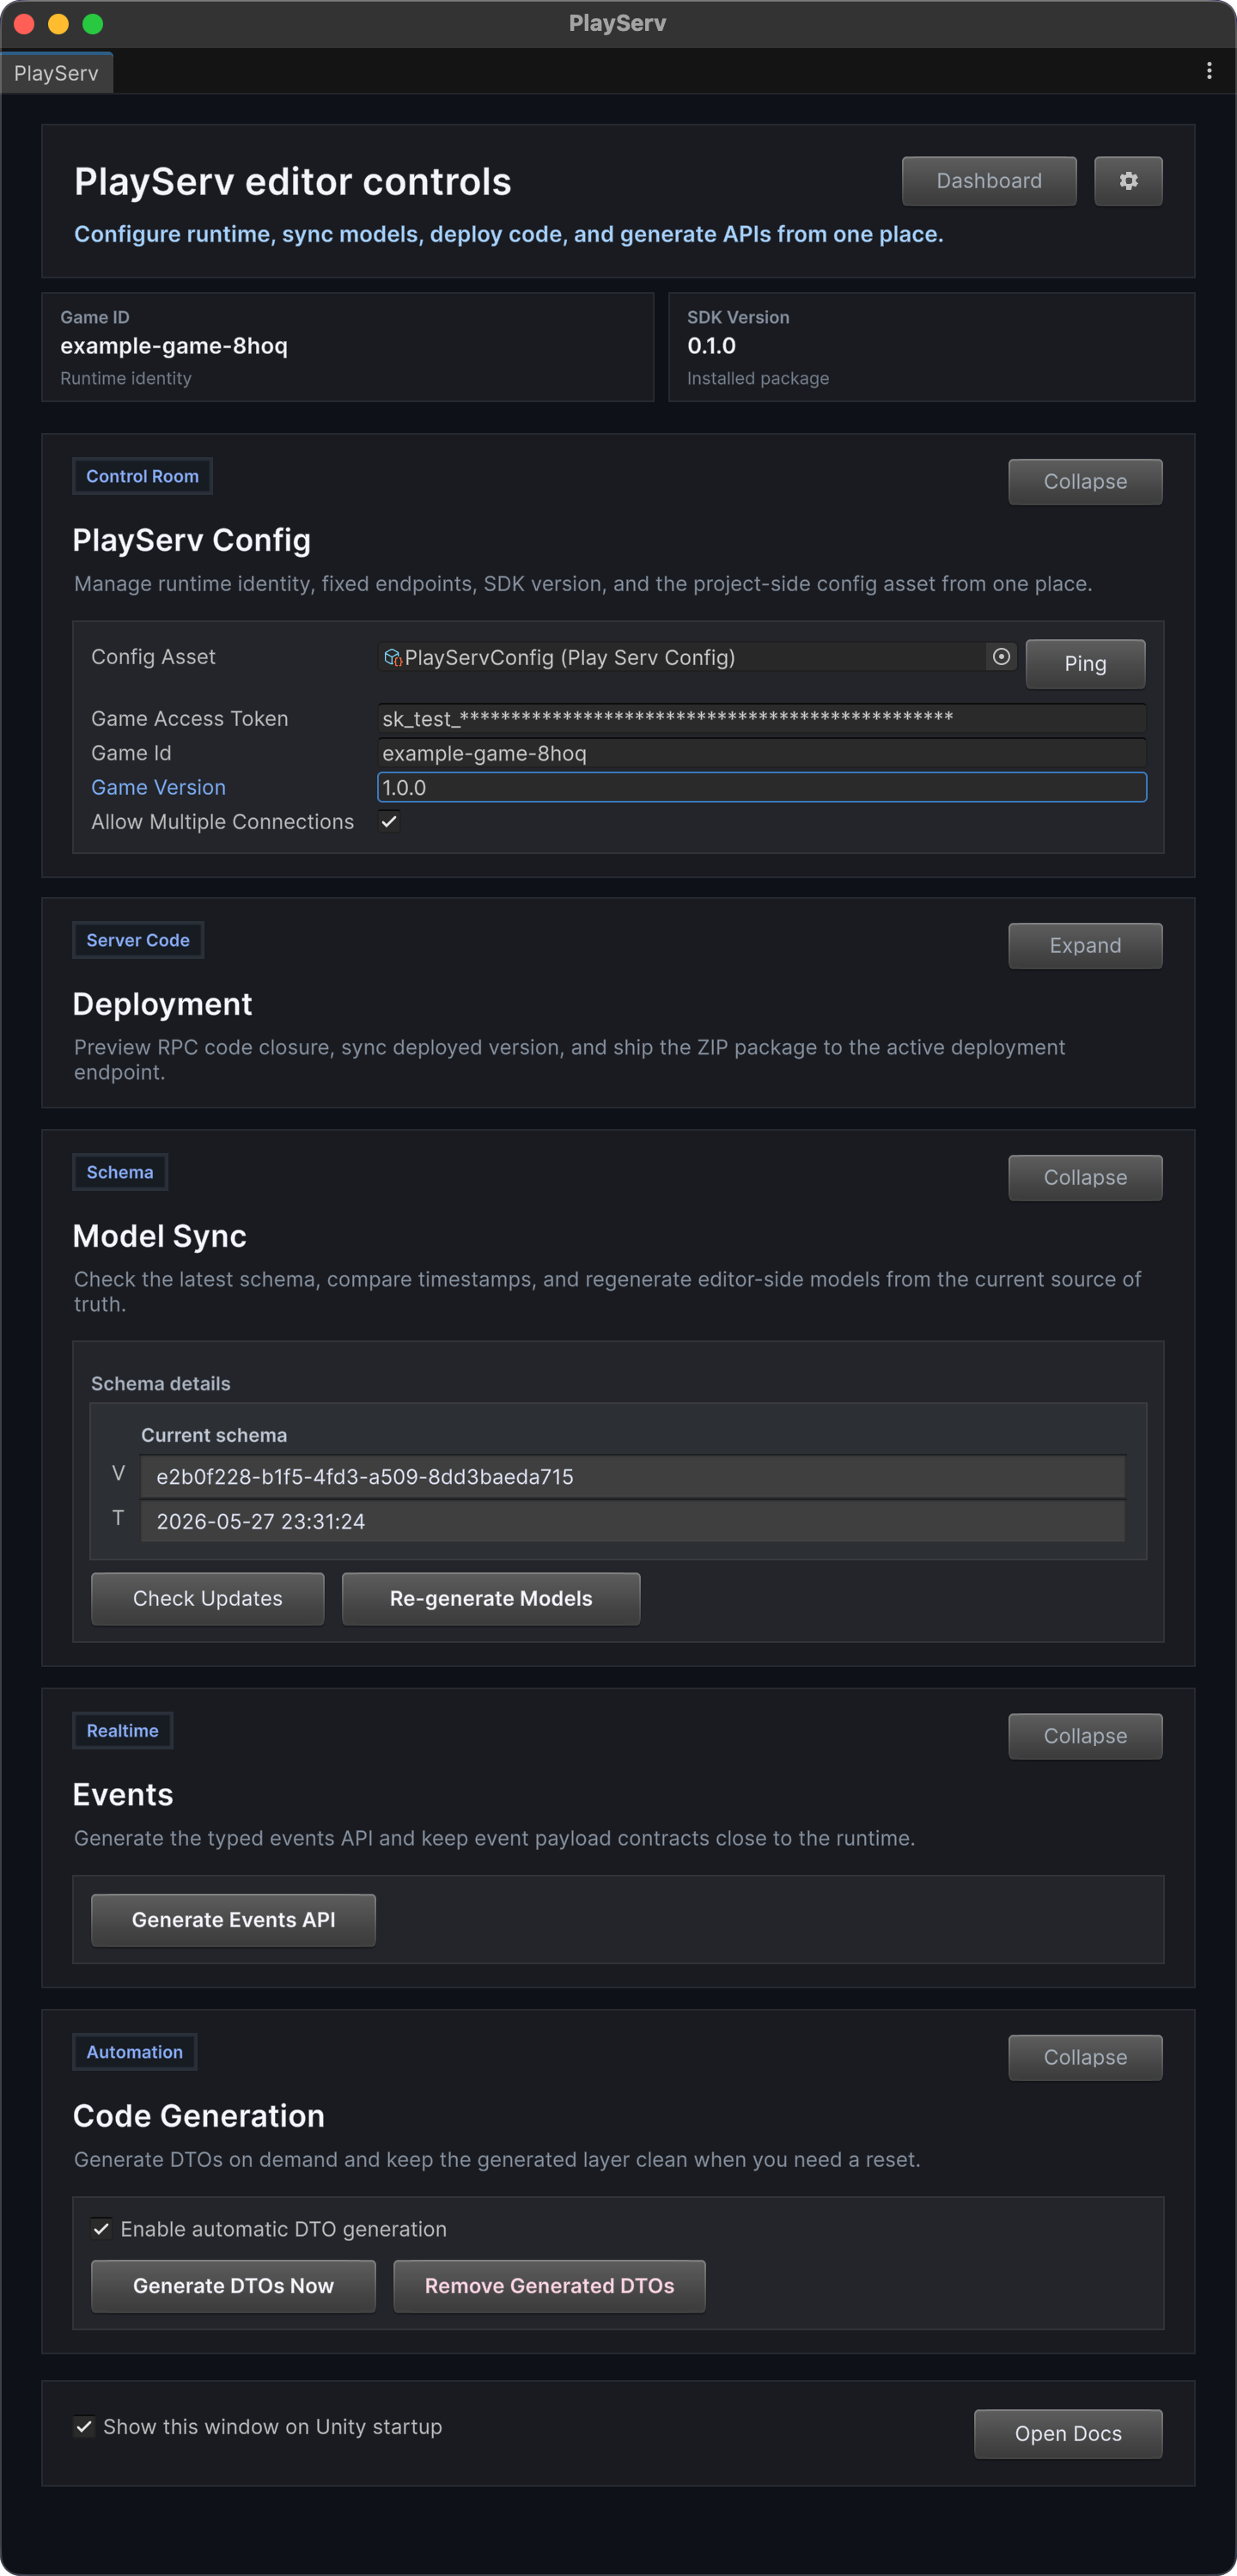
This guide uses PlayServ Config (below) and Model Sync (Step 3). The remaining sections cover server deployment and code generation.
In Control Room → PlayServ Config, fill in the project credentials:
Confirm the config asset
The Config Asset field should point at Assets/Resources/PlayServConfig.asset. If it does not exist yet, the window offers to create it. Use Ping to locate it in the Project window.
Enter the Game Access Token
Paste the Client key created in the Backoffice. Client keys are safe to ship in a game build — see API Key Management.
Danger
Never use a Server key as the Game Access Token. A Server key extracted from a game binary gives an attacker full backend access to your project.
Enter the Game ID and version
Set the Game Id to your project's Game ID, and the Game Version to your build version (for example 1.0.0). Enable Allow Multiple Connections if a single machine opens more than one client — for example, play-in-editor alongside a build.
Warning
Make sure the token and Game ID belong to the same PlayServ project and environment. A mismatched token and project ID will prevent the SDK from connecting correctly.
Tip
If your workflow uses the config asset as the source of truth, keep the credentials in this window and do not override them again in scene components unless that is intentional.
Sync the schema and generate models
The editor-side C# models are generated from the project schema, which is the source of truth. Sync them before writing gameplay code.
Check for schema changes
In Schema → Model Sync, the window checks the server for schema changes. When it reports A newer schema is available, review the Current schema and Latest available schema — compare the hash and timestamp of each.
Apply the latest schema
Click Apply New Schema to accept the latest schema from the server.
Regenerate the models
Click Re-generate Models. The generated models are written to Assets/Shared/Generated/Models.
Tip
Use Check Updates at any time to see whether your local models are behind the server schema. Re-run Re-generate Models whenever the schema changes in Backoffice.
Add a bootstrap script to the scene
Once the settings are configured, create a bootstrap script and attach it to a GameObject in the scene. This script reads the PlayServ configuration, applies the SDK settings, connects when the scene starts, and keeps the connection available across scene loads.
Create a persistent bootstrap object
Create an empty GameObject in the first scene of the project and name it PlayServBootstrap. A persistent bootstrap object is a good home for the connection logic.
Attach the bootstrap script
Attach the script below to the object.
using System;
using System.Threading.Tasks;
using Playserv.Proxy.Common;
using Playserv.Wrapper;
using UnityEngine;
using UnityEngine.Serialization;

namespace Playserv.Examples
{
    /// <summary>
    /// Persistent bootstrap component for configuring and connecting PlayServ in samples.
    /// </summary>
    public sealed class PlayServBootstrapSample : MonoBehaviour
    {
        private static PlayServBootstrapSample _instance;

        [Header("Credentials")]
        [SerializeField] private string gameAccessToken = "your-token";
        [SerializeField] private string gameId = "game-001";
        [SerializeField] private string userId = "player-001";
        [SerializeField] private string gameVersion = "1.0.0";
        [SerializeField] private bool overrideCredentialsFromInspector;

        [Header("Resolved Endpoints (Read Only)")]
        [FormerlySerializedAs("remoteEndpoint")]
        [SerializeField] private string backendServerAddress = PlayServSettings.DefaultBackendServerAddress;
        [SerializeField] private string deployApiServerAddress = PlayServSettings.DefaultDeployApiServerAddress;
        [SerializeField] private string schemaApiServerAddress = PlayServSettings.DefaultSchemaApiServerAddress;

        [Header("Behavior")]
        [SerializeField] private bool autoConnect;
        [SerializeField] private bool disconnectOnDestroy = true;

        [Header("KeepAlive")]
        [SerializeField] private int keepAlivePingIntervalMs = 5000;
        [SerializeField] private int keepAlivePongTimeoutMs = 5000;

        private bool _isOwner;

        private void Awake()
        {
            if (_instance != null && _instance != this)
            {
                Destroy(gameObject);
                return;
            }

            _instance = this;
            _isOwner = true;
            DontDestroyOnLoad(gameObject);
            RefreshResolvedEndpointsPreview();
        }

        private void Start()
        {
            if (!_isOwner)
                return;

            Configure();

            if (autoConnect &&
                PlayServ.State != PlayServState.Online &&
                PlayServ.State != PlayServState.Connecting &&
                PlayServ.State != PlayServState.Handshaking)
            {
                _ = ConnectAsync();
            }
        }

        private void OnEnable()
        {
            if (!_isOwner)
                return;

            PlayServ.OnTransportError += OnTransportError;
        }

        private void OnDisable()
        {
            if (!_isOwner)
                return;

            PlayServ.OnTransportError -= OnTransportError;
        }

        private void OnDestroy()
        {
            if (_instance == this)
                _instance = null;

            if (_isOwner && disconnectOnDestroy)
                PlayServ.Disconnect();
        }

        private void OnValidate()
        {
            RefreshResolvedEndpointsPreview();
        }

        [ContextMenu("Configure SDK")]
        public void Configure()
        {
            var settings = BuildSettingsFromConfig();

            if (overrideCredentialsFromInspector)
            {
                settings.GameAccessToken = gameAccessToken;
                settings.GameId = gameId;
                settings.UserId = userId;
                settings.GameVersion = gameVersion;
            }

            settings.KeepAlivePingIntervalMs = keepAlivePingIntervalMs;
            settings.KeepAlivePongTimeoutMs = keepAlivePongTimeoutMs;

            PlayServ.Config(settings);
            ApplyResolvedEndpointsPreview(settings);
            Debug.Log(
                $"[PlayServ][Sample] Configured. gameId={settings.GameId}, credentialsSource={(overrideCredentialsFromInspector ? "inspector" : "config")}, backend={settings.BackendServerAddress}, pingInterval={settings.KeepAlivePingIntervalMs}ms, pongTimeout={settings.KeepAlivePongTimeoutMs}ms");
        }

        [ContextMenu("Connect SDK")]
        public void Connect()
        {
            _ = ConnectAsync();
        }

        [ContextMenu("Disconnect SDK")]
        public void Disconnect()
        {
            PlayServ.Disconnect();
            Debug.Log("[PlayServ][Sample] Disconnected.");
        }

        public async Task ConnectAsync()
        {
            try
            {
                bool connected = await PlayServ.Connect();
                Debug.Log(connected
                    ? "[PlayServ][Sample] Connected."
                    : "[PlayServ][Sample] Connection failed.");
            }
            catch (Exception ex)
            {
                Debug.LogError($"[PlayServ][Sample] Connect error: {ex.Message}");
            }
        }

        private void OnTransportError(TransportError error)
        {
            Debug.LogError($"[PlayServ][Sample] Transport error: {error}");
        }

        private void RefreshResolvedEndpointsPreview()
        {
            var settings = BuildSettingsFromConfig();
            ApplyResolvedEndpointsPreview(settings);
        }

        private void ApplyResolvedEndpointsPreview(PlayServSettings settings)
        {
            if (settings == null)
                return;

            backendServerAddress = settings.BackendServerAddress;
            deployApiServerAddress = settings.DeployApiServerAddress;
            schemaApiServerAddress = settings.SchemaApiServerAddress;
        }

        private static PlayServSettings BuildSettingsFromConfig()
        {
            var config = Resources.Load<PlayServConfig>("PlayServConfig");
            if (config == null)
                return PlayServPackageDefaultsProvider.LoadSettingsOrDefault();

#if UNITY_EDITOR
            return PlayServSettingsResolver.ResolveEditorSettings(config);
#else
            return config.ToSettings();
#endif
        }
    }
}
Note
In the default flow, this script reads the credentials from the PlayServ config asset. Enable overrideCredentialsFromInspector only when you intentionally want to override the values set in the PlayServ editor controls window.
Run the scene and verify the connection
Enter Play Mode. If the setup is correct, the bootstrap component configures the SDK, connects automatically when autoConnect is enabled, and keeps the connection alive while the object exists.
Verify the connection in the Unity Console. Look for:
[PlayServ][Sample] Configured.[PlayServ][Sample] Connected.
If something goes wrong, the script also reports connection failures, transport errors, and configuration issues.
How this setup works
This flow separates configuration from runtime behavior:
- the PlayServ editor controls window stores the SDK configuration and keeps the editor-side models in sync with the schema
- the bootstrap script applies that configuration at runtime and opens the connection
That means project credentials are managed in one place, data models are generated from the schema rather than written by hand, and the scene only needs a small, reusable bootstrap component.
Tip
Use one persistent bootstrap object for the whole project instead of placing separate connection scripts in multiple scenes.
Common things to check
If the project does not connect as expected, check that:
- the SDK package was imported correctly
- the Game Access Token is a Client key and was copied correctly
- the Game ID matches the same Backoffice project
- the PlayServ config asset is present and filled in
- the models were regenerated after the latest schema change
- the bootstrap script is attached to an active GameObject
autoConnectis enabled if you expect connection on scene start
Warning
If the credentials are set in the PlayServ editor controls window, do not accidentally override them with different inspector values in the bootstrap component.
Next steps
- Building a Game Schema — model your game data
- Schema Object Reference — the building blocks of a schema
- Working with Game Data — read and write data from the SDK
Last updated on 5 Aug 2026